I’ve been using Slack for my past few communities. Yes, I know, even Stewart Butterfield said it wasn’t built for that, but many community folks use it and it’s best to go where your members are.
A few folks have asked about my approach to building Slack communities, so I thought it would be helpful to write some things down in case others may find it valuable.
This post will focus on how to set up Slack as software, not much more. Read my post on building a community if you want to learn more about the broader steps involved.
Step 1: Create a workspace
Most of us will be creating a FREE Slack workspace. You can do paid too (and there are many additional features that you will unlock if you do), but free can work.
You’ll be asked to enter an email and set up a workspace name which you can change later if needed provided no one else is using it.
Step 2: Setup channels
You don’t need many channels. Aim for as few as possible. Trust me here. Chances are it will feel awkward, but you’ll allow your community members to collaborate more effectively. Only add new channels when it makes sense.
Setup your channels. There will always be a #general channel (but you can change the name of this to something else if you want). There are lots of different ways to set up and name your channels and now is the time to try to get in the head of your members and use their language. Some folks use a prefix, others names, and others use numbers, it doesn’t matter. What does is whether your channels make sense to those who will use them. Josh Wayne has a great post on when to use Nouns vs. Verbs when naming navigation. I suggest keeping them short and clear. Common ones I like to have:
- #community — I use this prefix for things that will be communicating stuff about the community to members. Examples: #community-announcements, #community-guide
- #groups, #meet, #members — these can be helpful to create buckets of like-minded people based on interest, role, location, etc. Examples: #group-moms, #meet-nyc, #members-vancouver
- Brand stuff — if you include this lead with your name as a prefix like #supercommunity-events — make it clear this is stuff from you to your community
- #intros, #introductions, #say-hello offer a place for new joiners to announce their arrival
- #share I like using this prefix as it makes the purpose clear. Example: #share-jobs, #share-resources, #share-books, #share-podcasts, #share-product-feedback
- #talk again, the purpose is clear. It can be helpful to have one for that random or watercooler talk, especially if your community begins to shape an identity
I also like to avoid buzzwords and channel names that don’t immediately convey what folks should do there. Spend some time looking at other communities and form your own opinions.
You can also add these as channel prefixes.
Lastly, for each channel add a topic, description, relevant bookmarks and pinned messages, and a canvas. I’m particularly fond of canvases these days as they can act as mini-guides for a channel, housing key information, FAQs, and resources your members may need.
Step 3: Workspace settings
Starting off on the right foot will help you ensure everything works. Review your workspace settings and make sure they are set up correctly. Check every setting and if you’re in a company, confirm with your security and legal teams that you have things correctly configured.
Things I like to pay attention to especially:
SETTINGS
- Joining this workspace. Set how you will allow invitations and if you’re working for a company, include your domain to auto-approve invitations from your company domain
- Default channels. Set them up and set the default where folks will start (often #introductions-like channel is good but you could also use your #community-guide)
- Name display — I prefer full names to display names
- Email display — I usually set this to “No one”
- Pronouns display – turn it on, make everyone welcome
- Do not disturb – disable notifications outside typical work hours
- Channel join and leave messages – turn these off
- Workspace icon – change it here, 132×132 pixels is the size
- Workspace name and URL – you can change that here if you need to
PERMISSIONS
You can see an overview of your workspace permissions by going to this URL: https://<your-workspace>.slack.com/admin/permissions/account-types (sub out <your-workspace> with your workspace name.
They should look something like this:
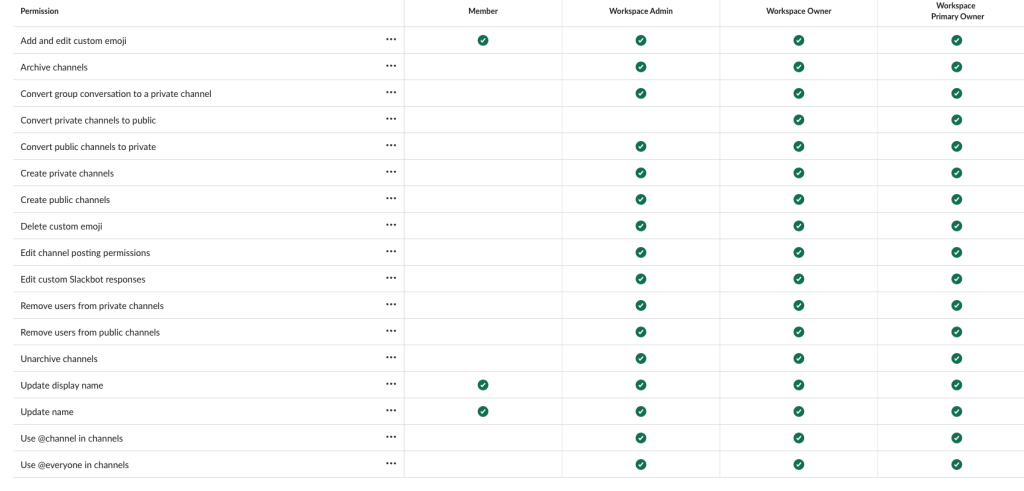
These are the core settings I highly suggest you think about:
- Messaging – control who can use @everyone, @channel, and @here to notify people. Nothing worse than this being abused so set it to Workspace Owners and Admins only. You should also think about what your policy will be here and use sparingly.
- Invitations – I prefer to require approval and send invite requests to channel. When I get one, I DM the person who make the request and re-direct them to signup via our website so new members accept T&Cs, code of conduct, etc. before joining.
- Channel management – unless you’re Rands, set this to Workspace Admins and Owners only.
- Message editing and deletion I like to set editing to Any time and allow everyone to delete.
- Custom emoji – set it to everyone and let your community have some fun.
- Slackbot responses – enable them, Workspace Owners and Admins only
AUTHENTICATION
You’ll want to make sure these are correctly done. Confirm with your IT team if needed. Make sure you have this setup correctly, you can check it out using your invite link and a private browser window to see the end-user experience.
My personal preference here for communities is to allow folks to sign-in via Google, Apple, and Email.

Step 4: Other Administration settings
There are lots of options in Slack. Check out user groups and profiles as these are typically the most important if used at all. Explore it all and configure how you feel best.
Step 5: Setup your invite link
Slack has a thing called an invite link. This is what folks use to join your workspace. It should be changed.
On the free, Pro, and Business+ plans, members with permission to send invitations can also share an invite link. Each invite link can be used by up to 400 people. You can ask Slack’s support to change this to a bigger number and they might, but it will still expire.
Make sure you edit the link settings, set to never expire.

Step 6: Add apps
Slack has a ton of applications in their app store. Your free Slack though will only allow for 10 maximum, so you should think about what’s important to have or not and what particular needs you have that require an app. Every community is different. Many communities need apps that integrate with other systems — Zoom, Hubspot, ticketing or support, poll, ask questions, feed in information from other sources, or administer your workspace. Some of my faves:
- Anonymous Bot – allows people to send an anonymous message to a Slack channel(s). This can be helpful where folks are afraid to ask a question publically and opens up a little bit more room for engagement. You can also use it to seed in some questions from time-to-time.
- Channel Tools – makes it really easy to add users to channels in bulk, export lists of members, etc. Must have when working with Slack day-to-day
- Common Room – I’m a big fan and a long-time user. It helps me understand who’s in my wider community audience, manages my workflows (onboarding, re-engagement, and others), segment effectively, and find the right people. It’s my community CRM and is a powerhouse when tied into GTM. There isn’t an hour that I’m not in there.
- RSS – bring your blog posts into a public channel, keep abreast of the latest information in a private channel, and have it automatically posted
- Just Polls or Simple Poll – not everyone engages via text, draw out your lurkers and opinionated folks with a poll or survey. You can also use Tightknit’s polls which are great.
- Skunk Mod – let your Slack community moderate posts and flag content of concern with a simple emoji reaction
- Tightknit – the new kid on the block. A front end to your Slack community built lovingly by a fantastic team. Enables you to bring your Slack community public with SEO, events, member directory, leaderboards, polls, and more. Plus it can get you over the 90-day limit in Slack. This is going to be transformational for community building.
- Neutral Face Emoji Tools – this was a suggestion from Regina Walton (thank you 😊 ), and is super helpful for bulk uploads of emojis.
When you’re done
Step back and admire your work. Bring in some of your community to test things out and kick the tires. Adjust as needed and build with your community.
2 replies on “How to build a community on Slack”
This is a fabulous guide. Thank you!
You’re most welcome. 🤗